Showing posts with label no-sew. Show all posts

Wednesday, February 29, 2012

St Patrick's Day Wreath


Pin It!


Valentine's Day is over and the next holiday is right around the corner: St. Patrick's Day! Here, in Savannah, St. Patrick's Day is HUGE! We're talking one of the largest in the country. We're talking 400,000 visitors a year large! Every year they have a huge parade including pipe and drum teams from around the nation, marching bands, floats, military, and more. The city turns green! It's green everywhere from people, animals, foutains, and beer. Depending on what part of the route you're standing, you could be watching a 3 hour parade. The parade is so big and there are so many people, that the county has to close the schools for the day because the buses can't get downtown with all the people and activities going on.

Two years ago, some of my friends went down for St. Patrick's Day (this was when I lived in Beaufort, SC). We had a blast and you can definitely meet some interesting people. For us it was a day trip, and we were not able to stay and enjoy the crazy night of St. Patrick's Day drinking that follows the daytime, more family oriented festivities. I have experienced the crazy night time festivities but that was four years ago. Here are a few pictures from St. Patrick's Day 2010.

We do not know this leprechaun but we just had to have a picture with him

Me in my St Patty's Day gear!

 Even the horses get all dolled up.

 All the fountains in Savannah, and there's a good amount are dyed green. The used to dye the Savannah River green but the EPA got involved and so now the city is not allowed. 


OK, I guess that's enough for my trip (and apparent plug) about St. Patrick's Day in Savannah. The real reason you stopped by my blog today: a St. Patrick's Day craft. To help get in the St. Patrick's Day spirit, I decided a wreath would be the perfect project! I had seen this wreath over at The Idea Room and new I wanted to make a wreath like this. It was perfect for a St. Patrick's Day wreath. All I needed was green felt and a shamrock-shaped wreath form. I looked everywhere; in any store I thought would sell wreath forms, online, and even sent my mom in Atlanta looking and you know what we found: NOTHING! Big bummer.

After finally giving up, I decided it would still be cute if I made this wreath in the traditional (traditional sounds so much better than standard, don't ya think?) circle shape. So this what I set out to do. I will continue to search for a shamrock-shaped wreath form, or eventually try my hand at making my own.

Materials Needed


Foam Wreath Form
Green Felt (you can use any shade of green you feel is appropiate for St. Patrick's Day. I chose a Kelly Green, But I know some people feel a darker green is better. That choice is up to you. Also, it is probably more cost efficient to buy the felt by the yard. The fabric store by my house was closed when I went to by my supplies so I bought the pre-cut sheets instead, but next time I will definitely wait for the fabric store to open)
Scissors
Straight Pins
Circle Template (this can be anything: a cup, a jar, a can, a stencil, etc. I used a circle template that I already owned which made the process easier, but it's definitely not necessary. The link provides you with one very similar to what I have
Gold Ribbon

***Note: This can be a very time consuming project, so I chose to work on this after the kids went to bed to help complete this project faster. Pop in a movie, grab a glass if wine (or tea, coffee or whatever you want to drink) and get started

1.   I started out by using my circle template and creating TONS ( and I mean tons) of 3" circles. I don't know how many I created but it was a lot. I used a green washable marker so that lines could wash out and were less likely to be seen.


2.   After creating all my circles, I cut them out. This was definitely the most time consuming part.


3.   Now that all the circles were cut out, it was time to put them on the wreath. I began by folding a circle in half.


4.   Then I folded it in half again, so you have folded it into fourths


5.   I then stuck a straight pin through the tip of what no looks like a pie piece.


6.   Take your pin and circle and stick it into the foam wreath form, pushing all the way down.


7.   Repeat steps 4-7 for each individual circle, placing each pin close together so it fills in any holes and gaps. I did not put any on the back, but I did put them on the top and bottom. I figured it make it easier to hang on the door without all the puffiness on the back.


8.   After finishing the wreath, I took some gold ribbon, cut it the length I wanted and then attached to the back of the wreath with a few extra straight pins. You could also hot glue as well.


I LOVE how it turned out and I'm already wanting to make another for other holidays and/or shapes!


Have you made anything for St. Patrick's Day yet? How about any wreaths?  Share it with me. You can upload your pics and links (if you have a site) via email, the Flickr group, or on my Facebook page and you could end up on Show Me Saturday!

Sunday, August 21, 2011

Ribbon (Or Tie-Waist) Tutu


Pin It!
Aren't those babies wearing tutus SO adorable? I think so, which is why I love making them and and why I love putting them on my daughter whenever I can find a good reason. Last weekend, she wore one just because we were going downtown.

Today, I made one because I want to have my kids pictures done with University of GA theme. My daughter has a UGA onesie, and my son has a shirt. I just need a way to dress up my daughter more than just a onesie. What better way to do that than with a UGA tutu.

This tutorial works for any ribbon and even if you don't want any ribbon in it. 

Materials needed:
Tulle (how much depends on the size of the child and the length you want to make it. For my 6 month old daughter, I use 2-3 yards, I think)
Ribbon for the waist (I try to make it match the color of my tulle unless it's multi-colored, then I try to make it match the lightest color)
Decorative Ribbon for the tutu
Scissors
Measuring Tape


Step 1:      Your first step is to measure the waist of the person that is going to be wearing the tutu and then add 12-14 inches and cut your waist ribbon (for me it's the black ribbon since my tutu is black) that length. The extra amount of ribbon that will be used to tie the ribbon closed.

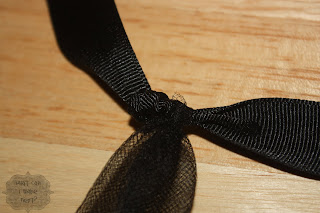
Step 2:     Once you have your waist ribbon cut, you'll need to tie the knots  at the end of the ribbon that will hold the tulle in place. How much extra did you measure after measuring the waist? I measured 12 inches. You want half of this length on each end of your ribbon before the knot so you will be able to tie your tutu closed. So for me, I measured 6 inches in:

and tied a knot.

Step 3:     Next you need to cut out strips of tulle. This is usually the most time consuming part.  You first have to decide the length you want the tutu. For  my 6 month old daughter (and most infants), I wanted her length to be 6 1/2." Once you decide on the length, you need to double it. So for me, the length of my tulle strips are 13." Once you know the length, you also have to decide how wide you want the strips. Most of the time the strips are anywhere from 5"-6" wide. Mine are 6." So I need strips that 6" x 13." Don't worry if your strips aren't perfect. You won't be able to tell once the skirt is made.
     *Note: Some craft and fabric stores sell rolls of tulle like ribbon that are already 6" wide, so all you
                 have to is cut the length. While these are more convenient, they are more expensive. 

Step 4:     Take your first tulle strip and fold it in half and place it over your ribbon. 

Step 5:     Your next step will be to bring the open end (or the end that is not the fold) under the ribbon.  I spread the fold out little so that it makes looping the open end easier.

Step 6: Pull the open all the through the hole and pull tight. Then slide the piece all the over to one end next the knot.

Repeat Steps 4-6 for each piece of tulle until the space between the ribbon is full.

If you want to add ribbon to your tutu, decide where in your tutu you would like to add the ribbon. Your ribbon lengths should be the same length as your tulle strips (but the width will deepend on the ribbon you have chosen). Your ribbon will attach the same way as your tulle. On this particular tutu I attached the ribbon after every 16 pieces of tulle.

Once you have attached all of your tulle and ribbon from knot to knot, you have a finished tutu for your princess.

Don't have the time or patience to make your own tutu but would still love one, contact me for information on prices and customization options. 


Related Posts Plugin for WordPress, Blogger...