Showing posts with label baby. Show all posts

Sunday, October 9, 2011

Baby Leg Warmers


Pin It!
There are two fantastic reasons why I just had to make these adorable baby leg warmers. Reason #1 is my little monkey has begun to crawl (ok, I admit it's not always fantastic. Boy, does she get into everything. lol). Reason #2 to make these baby leg warmers is fall is here and the temperatures are dropping. That's not quite the case here in Savannah. We've only had a few chilly mornings and no chilly days, but I'm sure some or most of you have have felt the cooler temperatures and I am jealous. I just have to be patient and they will eventually get her. I guess I should be grateful we're not in 95-105 ranges anymore.

Back to these leg warmers....they are SUPER easy and can cost almost nothing of you have an old pari of knee socks laying around

Here's what you need to get started:

pair of knee high socks (I bought a pair because I didn't have any, but of you have a pair you don't wear, save yourself the money and use that)
scissors
thread
sewing machine, and or a hand sewing needle

1.    Cut your socks at the ankle.


2.    Turn your socks inside out and fold the cut end down.


3.    Sew around them and flip right side out. My sewing machine was acting up so I had to sew them by hand which is not finest work but it still works and is perfect if you don't have a sewing machine or yours is broken as well.


And here's my model trying out her new leg warmers!


Saturday, September 3, 2011

Wooden Wall Letters


Pin It!
I love the wooden wall letters you see in a baby's room, but they can be so expensive especially to have them customized and match your room decor.I'm not really a painter but I knew there had to be something I could do to make my own letters for my daughter's room. Then it hit me....I could put some scrapbook paper on them.

It was off to Michael's to buy my needed materials:


Unfinished wooden letters
Scrapbook paper
Paint (optional)
Masking Tape (optional)
Mod Podge
Scissors
2 Paintbrushes (a foam brush for the Mod Podge and a regular paintbrush for painting)

Step 1: Cover the front of your letter with masking tape. This is totally optional but I did it so I wouldn't get paint on the front of my letter. I chose a dark paint and a light colored paper for the front so I didn't want the paint to show through the paper if I accidentally got any on the front.

Step 2: Paint the back and sides of your letters. Again, this is an optional step as well. You won't see the back and sides all that much once the letters are one the wall but I, personally, think they give the letters a more finished look.

Step 3: Trace your letters onto the back of your paper. Also make sure the front of your letter is touching the back of your paper.

Step 4: Once you have traced all your letters, then cut the letters out.

Step 5: Your next step is to apply a thin layer of Mod Podge to your wooden letters. (Note: It's hard to see the layer of Mod Podge, but I wanted to show you how thin I made it)

Step 6: Carefully place your cut out paper letter onto your wooden letter and let dry. Repeat steps 5 and 6 for each letter.

Step 7: After the Mod Podge has dried, you want to seal your paper over the letters so they don't peel. Apply a thin layer of Mod Podge over the paper and let dry. (Again, you may not be able to see my layer too well but hopefully you can and it will help)

Step 8: Once the Mod Podge dries, attach your ribbon to the back of your letters, or wall hangings to the back if you choose not to use ribbon. And then hang up your letters.


Don't have the time to make your own? Contact me here for information and pricing on letters for your home, whether it's for a nursery or just for home decor. We can customize the letters the way you want including colors, certain fonts, and size of letters as well as hanging options!


Wednesday, August 24, 2011

Baby Headband


Pin It!
I LOVE those crochet headbands. Unfortunately, I don't know how to crochet so I do have to buy those but I found this tutorial from Inspiration Organization on how to make a headband out of tights. YAY!!! At least I can make one some way and these are SO cute. For the great tutorial on how to make these adorable tights, click here. And take a peek at my little princess in her new headband, but having a rather grumpy morning and not wanting to look at me.

As always, if you don't the time, materials or patience but still want one, contact me for more information about having me make one for you

Sunday, August 21, 2011

Ribbon (Or Tie-Waist) Tutu


Pin It!
Aren't those babies wearing tutus SO adorable? I think so, which is why I love making them and and why I love putting them on my daughter whenever I can find a good reason. Last weekend, she wore one just because we were going downtown.

Today, I made one because I want to have my kids pictures done with University of GA theme. My daughter has a UGA onesie, and my son has a shirt. I just need a way to dress up my daughter more than just a onesie. What better way to do that than with a UGA tutu.

This tutorial works for any ribbon and even if you don't want any ribbon in it. 

Materials needed:
Tulle (how much depends on the size of the child and the length you want to make it. For my 6 month old daughter, I use 2-3 yards, I think)
Ribbon for the waist (I try to make it match the color of my tulle unless it's multi-colored, then I try to make it match the lightest color)
Decorative Ribbon for the tutu
Scissors
Measuring Tape


Step 1:      Your first step is to measure the waist of the person that is going to be wearing the tutu and then add 12-14 inches and cut your waist ribbon (for me it's the black ribbon since my tutu is black) that length. The extra amount of ribbon that will be used to tie the ribbon closed.

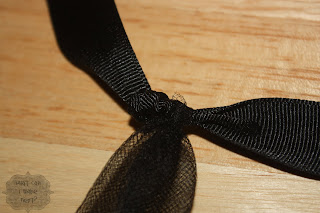
Step 2:     Once you have your waist ribbon cut, you'll need to tie the knots  at the end of the ribbon that will hold the tulle in place. How much extra did you measure after measuring the waist? I measured 12 inches. You want half of this length on each end of your ribbon before the knot so you will be able to tie your tutu closed. So for me, I measured 6 inches in:

and tied a knot.

Step 3:     Next you need to cut out strips of tulle. This is usually the most time consuming part.  You first have to decide the length you want the tutu. For  my 6 month old daughter (and most infants), I wanted her length to be 6 1/2." Once you decide on the length, you need to double it. So for me, the length of my tulle strips are 13." Once you know the length, you also have to decide how wide you want the strips. Most of the time the strips are anywhere from 5"-6" wide. Mine are 6." So I need strips that 6" x 13." Don't worry if your strips aren't perfect. You won't be able to tell once the skirt is made.
     *Note: Some craft and fabric stores sell rolls of tulle like ribbon that are already 6" wide, so all you
                 have to is cut the length. While these are more convenient, they are more expensive. 

Step 4:     Take your first tulle strip and fold it in half and place it over your ribbon. 

Step 5:     Your next step will be to bring the open end (or the end that is not the fold) under the ribbon.  I spread the fold out little so that it makes looping the open end easier.

Step 6: Pull the open all the through the hole and pull tight. Then slide the piece all the over to one end next the knot.

Repeat Steps 4-6 for each piece of tulle until the space between the ribbon is full.

If you want to add ribbon to your tutu, decide where in your tutu you would like to add the ribbon. Your ribbon lengths should be the same length as your tulle strips (but the width will deepend on the ribbon you have chosen). Your ribbon will attach the same way as your tulle. On this particular tutu I attached the ribbon after every 16 pieces of tulle.

Once you have attached all of your tulle and ribbon from knot to knot, you have a finished tutu for your princess.

Don't have the time or patience to make your own tutu but would still love one, contact me for information on prices and customization options. 


Wednesday, August 17, 2011

Cloth Baby Blocks


Pin It!
I was browsing around the internet at work a few weeks ago looking for something to make when I came across this website, Make It, Love It. I fell in love. There are oodles of cute ideas; everything from home decor to clothes to sweet little items for babies.

It was in the baby section that I found a tutorial for some adorable Cloth Baby Blocks. They were so cute and seemed so simple, I just had to try it and the best part; I can throw them in the wash when they get dirty. Click here if you're interested in your own set of baby blocks.


I don't have pictures of my progress of the blocks (when I started them, I didn't think about writing a blog).

I found the tutorial perfect. The directions and pictures (something I find very helpful) showed me exactly what I needed to do. And Jordyn, my daughter loved them!

The website also has a Cloth Baby Ring tutorial that I fully intend on making soon too. Be on the lookout for that in the next few weeks!


***Do you need some items to complete this project? Click here to see the Cloth Baby Blocks Astore Page to purchase the needed items!
Related Posts Plugin for WordPress, Blogger...